


Last updated: November 2026
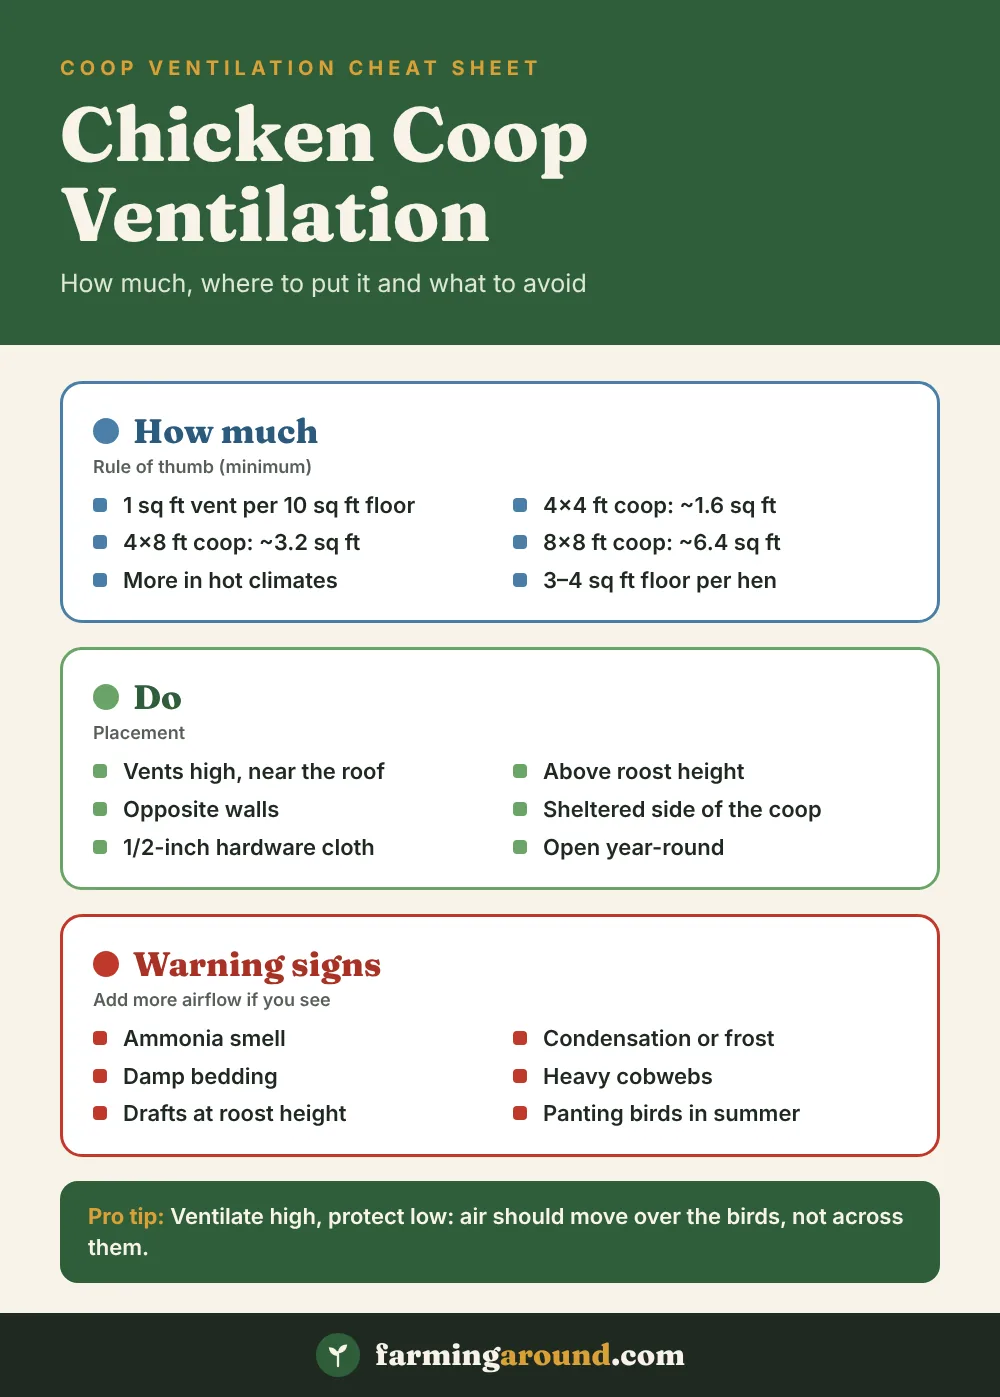
Good chicken coop ventilation means steady airflow high in the coop, above the roosts, so moisture and ammonia escape without a draft blowing on your birds. A widely used rule of thumb is about 1 square foot of vent opening for every 10 square feet of coop floor, placed on opposite walls near the roofline and covered with hardware cloth. Keep vents open year-round, including in winter.
Most coop problems people blame on cold, from frostbitten combs to wet bedding and coughing hens, actually come from too little fresh air. This guide explains why ventilation matters, how much you need, where to put vents, which designs work, how to adjust for winter and summer, and the mistakes to avoid.
Key takeaways
- Rule of thumb: about 1 sq ft of vent for every 10 sq ft of coop floor, and more in hot climates.
- Put vents high, near the roofline and above the roosts, on opposite walls for cross-flow.
- Ventilation isn’t a draft: keep air moving overhead, not across birds at roost height.
- Keep vents open in winter and cover every opening with 1/2-inch hardware cloth.
In this guide
- Why Coop Ventilation Matters
- How Much Ventilation Does a Chicken Coop Need?
- Where to Put Vents
- Ventilation vs Drafts: What’s the Difference?
- Types of Coop Vents That Work
- How to Add Ventilation to an Existing Coop
- Winter Coop Ventilation
- Summer Coop Ventilation
- Common Ventilation Mistakes
- Quick Reference
- FAQ
- Sources
Why Coop Ventilation Matters
Chickens breathe out a lot of moisture, and their droppings release more. Without a way out, that damp air condenses on walls and ceilings, soaks the bedding, and feeds the bacteria that turn uric acid in droppings into ammonia. Extension poultry specialists at Virginia Tech, Penn State and the University of Maryland all point to the same warning signs of poor ventilation: an ammonia smell, dampness or condensation, and heavy cobwebs.
Fresh air does four jobs at once:
- Removes moisture, which keeps bedding dry and reduces frostbite risk in winter.
- Clears ammonia, which irritates eyes and airways.
- Removes carbon dioxide and dust from a crowded space.
- Lets heat escape in summer, when overheating is a real danger.
Healthy adult chickens cope with cold well when they’re dry and fully feathered. University of Maryland Extension puts it simply: birds handle cold temperatures only if kept dry. That’s why a sealed-up, “cozy” coop often does more harm than good.
How Much Ventilation Does a Chicken Coop Need?
Extension guides describe ventilation in terms of results (dry air, no ammonia, no drafts) rather than an exact number, but keepers and hatcheries use simple rules of thumb to get started:
| Coop floor area | Vent area at about 1 sq ft per 10 sq ft of floor | Typical flock (at 3–4 sq ft per hen) |
|---|---|---|
| 16 sq ft (1.5 m²), e.g. 4 × 4 ft | About 1.6 sq ft (0.15 m²) | 4–5 hens |
| 32 sq ft (3 m²), e.g. 4 × 8 ft | About 3.2 sq ft (0.3 m²) | 8–10 hens |
| 64 sq ft (6 m²), e.g. 8 × 8 ft | About 6.4 sq ft (0.6 m²) | 16–21 hens |
| 96 sq ft (9 m²), e.g. 8 × 12 ft | About 9.6 sq ft (0.9 m²) | 24–32 hens |
Measure the open area, not the frame size: screens and louvers block part of an opening, so many builders add extra to compensate. Treat these figures as a minimum. In hot, humid climates you’ll want much more, often whole walls of hardware cloth. Space matters too; Virginia Tech Extension recommends 3–4 square feet of indoor space per standard laying hen, and adequate space per bird helps keep humidity down.
The real test is your nose and your eyes. If you smell ammonia at chicken height, see condensation on the ceiling on cold mornings, or find damp bedding under the roosts, you need more airflow.

Where to Put Vents
Placement matters as much as size. The goal is air that moves through the top of the coop while the birds sleep in still air below it.
- High, above the roosts. Warm, moist air rises. Vents near the roofline let it escape. Keep the top of each vent at least a foot or so above roost height so birds aren’t sitting in a breeze.
- On opposite walls. Openings on two sides allow cross-flow. For small coops, Penn State Extension notes that vents on one side often provide plenty of ventilation.
- Away from prevailing winter winds. Extension guides recommend placing main openings on the south or east side in the Northern Hemisphere (north or east in the Southern Hemisphere).
- Never directly over the perches. Penn State specifically warns against vents or windows that open straight over the roosting area.
- Angled upward where possible. Inlets that direct incoming air up help it mix with warmer air before it reaches the birds.
Pro tip: Do the candle test on a windy evening: hold a lit candle or a strip of tissue at roost height. If it flickers or flutters, seal that draft; leave the high vents alone.
Ventilation vs Drafts: What’s the Difference?
This is where many new keepers go wrong. Ventilation is air exchange through the upper part of the coop. A draft is moving air that blows directly on the birds, especially while they roost at night.
A simple check: on a windy evening, hold a lit candle, a strip of tissue or the back of your wet hand at roost height. If it moves noticeably, you have a draft to fix. Gaps near the floor or at roost level should be sealed; gaps up under the eaves are usually your friends.
Watch: coop ventilation vs drafts
The Featherbrain explains the difference between healthy ventilation and drafts in a backyard coop.
Types of Coop Vents That Work
| Vent type | Best for | Pros | Cons |
|---|---|---|---|
| Open eaves / soffit gaps | Most coops, all climates | Constant passive airflow high up; cheap | Must be screened against predators |
| Gable or louvered vents | Shed-style and larger coops | Adjustable on some models; sheds rain | Small units may not give enough open area alone |
| Ridge vent | Gable-roof coops | Excellent exhaust at the highest point | Best paired with lower intake vents |
| Windows (sliding) | Summer airflow and light | Easy to open more in heat | Swinging windows give birds a perch; sliding is better |
| Hardware-cloth walls or panels | Hot climates | Maximum airflow | Need storm shutters or covers for cold snaps |
| Fans | Hot, humid weather; large coops | Active cooling and moisture removal | Need power; must not blow directly on birds |
Whatever you choose, cover every opening with 1/2-inch hardware cloth, not chicken wire. Chicken wire keeps chickens in; it doesn’t keep raccoons, weasels or rats out. Oregon State University Extension also notes openings should be too small for predators to enter.

How to Add Ventilation to an Existing Coop
- Measure the floor area and work out your target vent area (floor area ÷ 10 as a starting point).
- Find your roost height and mark a line at least a foot above it. Plan new openings above that line.
- Check prevailing winds and plan most of the venting on the sheltered side, with a smaller opening opposite for cross-flow.
- Cut the openings between studs with a jigsaw or oscillating tool. Long horizontal slots under the eaves work well.
- Cover with hardware cloth, fixed with screws and washers or staples plus wood trim so no sharp edges stick out.
- Add rain protection: an overhanging roof, drip edge or hinged flap so rain and snow don’t blow in.
- Make some vents adjustable with sliding or hinged covers so you can reduce, but not close, airflow in storms.
- Test it with the candle or tissue check at roost height, then watch for ammonia and condensation over the next few weeks.
Don’t seal the coop for winter. Closing every vent traps moisture from breath and droppings. Damp air in the cold is what causes frostbite on combs and wattles, and it raises ammonia levels that irritate the birds’ airways.
Winter Coop Ventilation
It feels wrong to leave holes open when it’s freezing, but winter is when ventilation matters most. Moisture is the real enemy: damp air plus cold is what causes frostbite on combs and wattles. Keep high vents open, partially close the windward side if needed, and keep the roost area draft-free.
- Expect inside temperatures close to outside temperatures in a well-ventilated coop. That’s normal.
- Check for frost or condensation on the ceiling in the morning. If you see it, add airflow.
- Keep waterers in the run where practical. Virginia Tech Extension notes this helps keep humidity lower inside the coop.
- Insulation can help reduce condensation, but only alongside ventilation, never instead of it.
For the full cold-weather routine, see our guides to winterizing a chicken coop, coop insulation and whether you should be heating your chicken coop at all.
Summer Coop Ventilation
Heat is more dangerous to chickens than cold. In summer, open everything you can: windows, doors to a secure run, and any removable panels. Signs your birds are too hot include panting with open beaks, wings held away from the body, and lethargy.
- Use sliding windows or hinged panels you can open wide on hot days.
- Mount a fan for cross-ventilation in very hot or humid weather, as University of Maryland Extension suggests, aimed so it doesn’t blow straight onto roosting birds.
- Shade the coop and run, and provide plenty of cool, clean water.
- Light-colored or reflective roofing reduces heat build-up under the roof.
Common Ventilation Mistakes
- Sealing the coop for winter. This traps moisture and raises frostbite and respiratory risk.
- Vents at roost level. Airflow across sleeping birds is a draft.
- Using chicken wire on openings. Predators can tear or reach through it.
- Too many birds for the space. More birds mean more moisture and ammonia than the vents can handle.
- Letting bedding stay wet. Clean wet spots promptly and keep enough dry bedding down.
- Swinging windows birds can perch on. Sliding windows avoid this.
Planning a new build? Ventilation is much easier to design in than to retrofit. Our chicken coop plans guide shows layouts with ventilation built in, and our beginner’s guide to raising chickens covers the rest of the setup.
Helpful gear for this guide
Handy picks that match the advice above.
Quick Reference
FAQ
Should chicken coop vents be open in winter?
Yes. Keep high vents open all winter. You can partly cover vents on the windward side during storms, but closing a coop up completely traps moisture, which increases the risk of frostbite and respiratory problems.
Can a chicken coop have too much ventilation?
Ventilation itself is rarely the problem; drafts are. As long as air isn’t blowing directly on the birds at roost height, generous high ventilation is fine, especially in warm climates.
How do I know if my coop has poor ventilation?
The main signs are an ammonia smell, condensation or frost on walls and ceilings, damp bedding, heavy cobwebs, and birds with watery eyes or wheezing.
Do small coops need ventilation?
Yes, and small coops can be the worst offenders because moisture builds up quickly in a small air space. Even a coop for three or four hens needs screened openings above the roost.
Is a fan necessary in a chicken coop?
Not usually. Passive vents are enough for most backyard coops. A fan helps in hot, humid weather or in larger coops, but it should never blow straight onto the birds.
How high should coop vents be?
Place them near the roofline, above the roosts. A practical target is keeping the bottom of the main vents higher than your top roost bar.
Sources
- Housing for Small Flocks (Virginia Cooperative Extension)
- Small-Scale Poultry Housing (Penn State Extension)
- Small Flock Housing (University of Maryland Extension)
- Why Coop Ventilation Matters (Meyer Hatchery)
If birds show signs of respiratory illness, contact a vet who treats poultry or your local extension office.
This guide contains affiliate links. As an Amazon Associate, FarmingAround earns from qualifying purchases, at no extra cost to you.
Get free farming guides in your inbox
Practical guides, seasonal tips and market updates. No spam, unsubscribe anytime.
Subscribe free



5 Comments