

Last updated: October 2026
A good microgreens growing kit gives you shallow trays with drainage holes (ideally a 10 × 20 inch “1020” tray nested in a solid tray for bottom watering), a clean growing medium such as seed-starting mix, coconut coir or a hemp mat, and seeds clearly labeled for microgreens or untreated. Add a grow light unless you have a bright south-facing window. For a first kit, one or two trays and easy, fast crops like radish, broccoli or pea shoots are plenty.
This guide walks through the kit types on the market, what size you need, the features that actually matter, the best seeds to start with, how to use a kit step by step and the red flags that mean a kit isn’t worth buying.
Key takeaways
- Trays need drainage, plus a solid tray underneath so you can water from below.
- Seeds must be labeled for microgreens or untreated. Some garden seed is coated with fungicide.
- Light makes or breaks it. Without a bright window, choose a kit with an LED light or add one.
- Check refill costs before buying a kit that only works with its own pods or mats.
In this guide
What’s in a Microgreens Growing Kit
Microgreens are the young seedlings of vegetables and herbs, harvested once the first leaves open, usually 1–3 inches (2.5–7.5 cm) tall. They need very little: a shallow container, a thin layer of growing medium, dense seed, water and light. A complete kit bundles some or all of these:
- Growing trays: shallow trays with drainage holes, often with a solid tray underneath.
- Growing medium: seed-starting mix, coconut coir, or a fiber mat made from hemp, coir or similar materials.
- Seeds: one or more varieties, sometimes pre-measured for one tray.
- A cover: a humidity dome or second tray to keep seeds dark and moist while they germinate.
- A spray bottle for misting.
- A grow light in some kits, often a small LED bar or panel.
If you’ve never grown them before, our guide on how to grow microgreens covers the basics in more depth.

Types of Microgreens Kits
| Kit type | What you get | Pros | Cons | Best for |
|---|---|---|---|---|
| Tray + soil or coir kit | 1020 or half-size trays, bagged mix or coir, seeds | Forgiving, works for almost every variety, reusable trays | A little messier; you dispose of used media | Most beginners |
| Hydroponic mat kit | Trays plus hemp, coir or fiber grow mats | Clean, no soil indoors, easy to harvest | Mats dry out faster; a few crops do better in soil | Kitchens and apartments |
| Countertop or self-watering kit | Small tray with a water reservoir and pre-seeded pads | Tidy and simple; needs little attention | Small harvests; refills may be brand-specific | Small households, gifts |
| Kit with grow light | Trays, media, seeds and an LED light | Works anywhere in the home, year-round | Costs more up front; check the light’s size and timer | Homes without a sunny window |
| Seed and media refill packs | Seeds and mats or coir only | Cheapest way to keep growing | You supply trays and light | Growers who already have trays |
What Size Kit Do You Need?
Tray size is the main thing to compare. The standard is the 1020 tray, about 10 × 20 inches (25 × 50 cm), which Utah State University Extension recommends for home growing. Half-size trays (about 10 × 10 inches, or 25 × 25 cm) and small countertop trays are easier to fit on a windowsill.
- Trying microgreens for the first time: one or two small or half-size trays.
- Regular salads and sandwiches for a household: two to four 1020 trays, started a few days apart so you always have a fresh batch.
- Selling at a farm stand or market: skip kits and buy commercial trays, media and seed in bulk. Our farm stand ideas guide has tips on selling small-batch produce.
Most crops are ready in one to two weeks, so staggering several small trays gives a steadier supply than one big tray.
Features That Matter
Trays with drainage and a solid base
Look for shallow trays about 1–2 inches (2.5–5 cm) deep with drainage holes, as Clemson Cooperative Extension recommends. A solid tray underneath lets you water from below, which keeps the leaves dry and reduces mold. Thick, stiff trays last for years; thin, flimsy ones crack after a few uses.
Growing medium
Utah State University Extension lists seed-starting mix, coconut coir and hydroponic grow mats as good options. Clemson advises against garden soil, manure or compost, which may carry bacteria. Hemp and coir mats are the tidiest; seed-starting mix and coir hold moisture better and suit larger seeds like sunflowers and peas.
Seed quality
Seeds should be labeled for microgreens or marked “untreated.” Clemson Extension points out that some garden seed is pre-treated with fungicides, which you don’t want on a crop you eat whole. Good kits also say which variety is included and how much seed goes in each tray.
Light
Microgreens grown in dim light stretch, flop and turn pale. A south-facing window can work in summer, but winter days are short. Utah State’s trials ran lights 18 hours on and 6 hours off on a timer, and Clemson suggests keeping a grow light about 4 inches (10 cm) above the seedlings. If a kit includes a light, check that it covers the whole tray and is height-adjustable.
A cover or blackout tray
Seeds germinate best covered, dark and humid for the first few days. A lid, humidity dome or second tray that fits over the first is a useful extra.
Reusability and refills
Standard 1020 trays work with any seed and media you buy later. Kits built around proprietary pods or pads lock you into one brand’s refills, so price those before you commit.
Best Microgreens for Beginner Kits
These crops are fast, reliable and tasty. Seed amounts and timings come from Utah State University Extension’s home trials, per 1020 tray (halve them for a 10 × 10 tray).
| Crop | Seed per 1020 tray | Presoak | Days to harvest |
|---|---|---|---|
| Arugula | 10 g (about 0.35 oz) | No | 6–8 |
| Broccoli | 28 g (about 1 oz) | No | 8–12 |
| Kale | 28 g (about 1 oz) | No | 8–12 |
| Radish | 42 g (about 1.5 oz) | No | 8–12 |
| Sunflower | 48 g (about 1.7 oz) | 12 hours | 9–10 |
| Pea shoots | 150 g (about 5.3 oz) | 6 hours | 8–10 |
| Basil | 28 g (about 1 oz) | No | 12–16 |
Radish and broccoli are the most forgiving. Basil and cilantro are slower and fussier, so save them for your second or third round.
How to Use a Microgreens Kit
- Prepare the medium. Moisten coir or mix until it feels like a wrung-out sponge, then spread it evenly in the tray with holes. Utah State uses about 2 quarts (about 2 liters) of coir per 1020 tray. For mats, soak them first.
- Sow thickly. Scatter the seed evenly over the surface and press it gently into the medium. Cover large seeds lightly.
- Water from below. Set the tray in the solid tray with about 2 cups (roughly 500 ml) of water and pour off what’s left after 30 minutes.
- Cover and weight. Place another tray on top with a 2–5 lb (1–2 kg) weight for the first day or two, then flip the cover so it shades the seeds without touching them until they’re about an inch tall.
- Give them light. Once they’re uncovered, put them under a light about 4 inches (10 cm) above the leaves, or in your brightest window. A small fan on low helps prevent mold.
- Keep them comfortable. Utah State used about 74°F (23°C) for germination, 72°F (22°C) with lights on and 68°F (20°C) with lights off.
- Harvest when the first leaves are open and the greens are 1–3 inches (2.5–7.5 cm) tall. Cut just above the medium with clean scissors.
Watch: Growing microgreens start to finish
Epic Gardening takes you through growing microgreens from start to finish in this full guide.
Red Flags to Avoid
- Trays with no drainage and no way to bottom water.
- Unlabeled seed, or seed that doesn’t say it’s for microgreens or untreated.
- Garden soil or compost as the included medium, which Clemson Extension advises against for microgreens.
- Vague light specs, such as no wattage, no coverage area or no height adjustment.
- Proprietary refills only, with no option to use standard seed and mats.
- Big claims like “harvest in 3 days” or “superfood yields,” and no clear instructions.
- Brittle, thin plastic that won’t survive washing and reuse.
Don’t use leftover garden seed. Seed packets meant for planting outdoors may be treated with fungicides or other chemicals that aren’t safe to eat. Only use seed sold for microgreens or sprouting, or clearly labeled untreated.
DIY Kit vs. Ready-Made
A ready-made kit is the easiest way to try microgreens: everything fits together and the instructions are matched to the seed. It’s a nice gift too. Once you know you enjoy growing them, a DIY setup is usually cheaper per tray. Buy two 1020 trays (one with holes, one without), a block of coconut coir or a pack of hemp grow mats, a few seed varieties in bulk and a simple LED shop light on a timer.
Pro tip: Start a new tray every 4–7 days instead of sowing everything at once. You’ll harvest a steady supply and learn which crops your household actually eats.
If you already have a light setup for herbs, the same shelf works for microgreens. Our indoor herb garden guide covers lights and placement, and if you want to try a bigger hydroponic project, see our strawberry hydroponic system guide.
Food Safety Basics
Microgreens are grown in light and cut above the medium, but they’re still eaten raw, so clean habits matter. Clemson Extension recommends:
- Washing reused trays with soap and water between crops.
- Using fresh growing medium for every new sowing.
- Avoiding garden soil, manure and compost as growing media.
- Storing harvested greens in a clean bag in the refrigerator and washing them just before eating.
Fine white fuzz on the roots of radish and broccoli is usually normal root hairs, which look like mold but disappear when misted. Gray, slimy or smelly patches on the stems or medium are mold: discard that tray, wash it and increase airflow next time.

Helpful gear for this guide
Handy picks that match the advice above.
Links go to Amazon. Prices and availability change, so check reviews and fit for your setup before buying.
Quick Reference
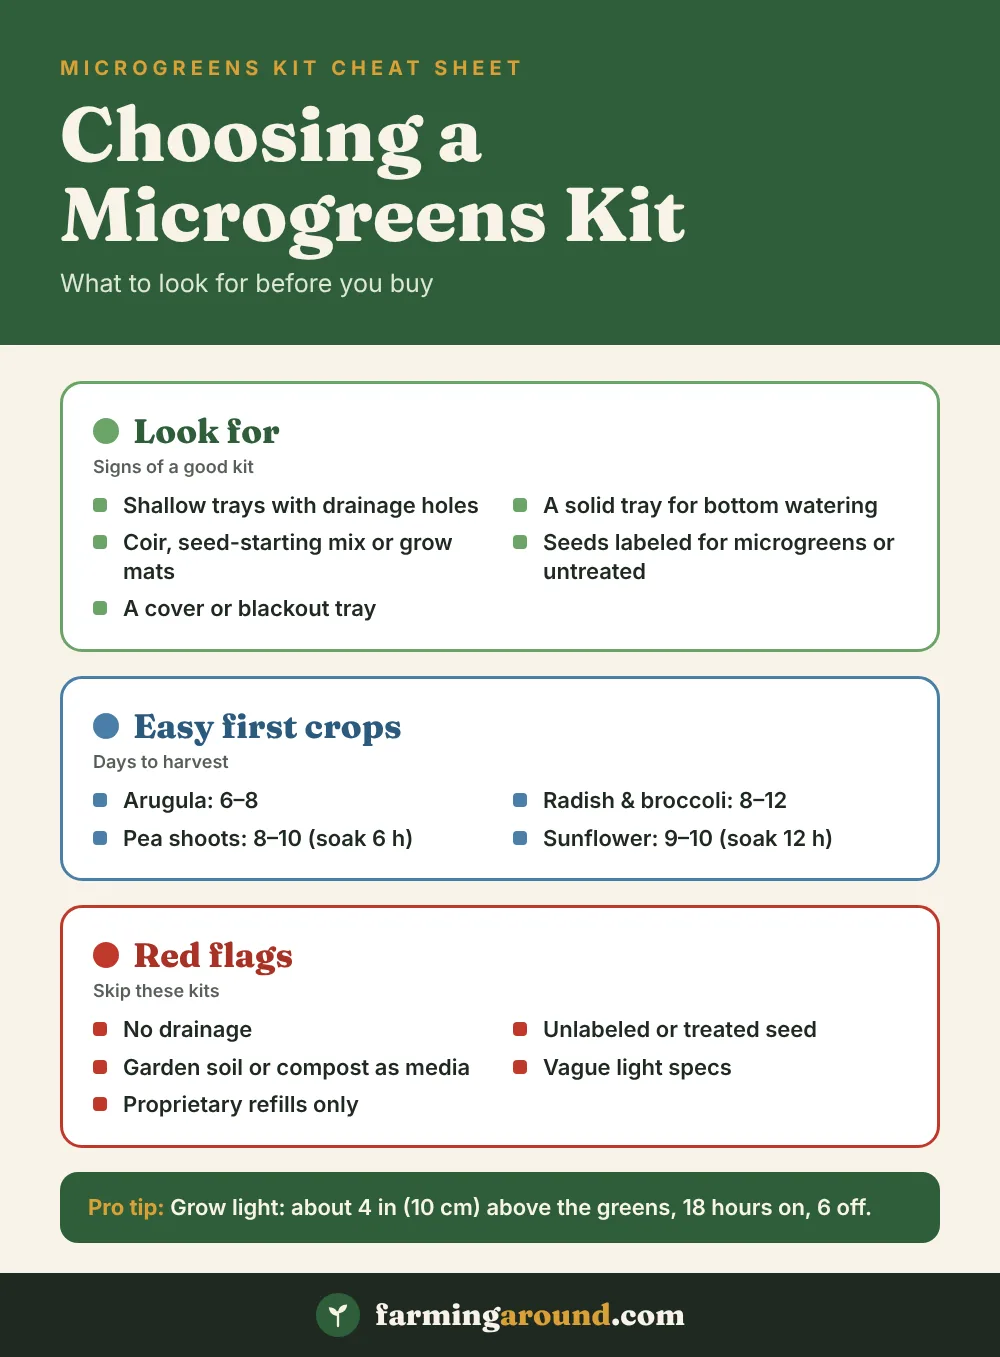
Pin this checklist for your next kit purchase:
FAQ
Are microgreens growing kits worth it?
They’re worth it for trying microgreens with no guesswork, and as a gift. If you plan to grow regularly, reusable 1020 trays with bulk seed and media cost less per harvest over time.
Do microgreens kits need a grow light?
Not always. A bright south-facing window can work, especially in summer. In winter or in darker homes, a grow light gives sturdier, greener microgreens.
Can you reuse a microgreens kit?
Trays, lids and lights can be reused for years. Wash trays with soap and water between crops and use fresh growing medium and seed each time.
What’s the easiest microgreen for beginners?
Radish and broccoli are the easiest. They sprout fast without soaking and are ready in about 8–12 days.
How long does it take to grow microgreens from a kit?
Most crops are ready in about 6–16 days, depending on the variety. Arugula is among the fastest, while basil and cilantro take longer.
Can I use regular garden seeds for microgreens?
Only if they’re clearly labeled untreated. Seeds treated with fungicides aren’t safe for microgreens, so seed sold for microgreens or sprouting is the safest choice.
Sources
- Clemson Cooperative Extension, Home & Garden Information Center: Growing Microgreens
- Utah State University Extension: Grow Your Own Microgreens
This guide contains affiliate links. As an Amazon Associate, FarmingAround earns from qualifying purchases, at no extra cost to you.
Get free farming guides in your inbox
Practical guides, seasonal tips and market updates. No spam, unsubscribe anytime.
Subscribe free


2 Comments